
Do you have an important Excel file with confidential data? If yes, you should make it password-protected. Excel is the go-to worksheet for most organizations. Be it the government, IT, or other companies dealing with reports and stock collection daily. Some of the data is not applicable for everyone to access. Therefore, you need to get a password on the sheet. Now, you must be wondering how to password protect an Excel file!
While Excel enables you to organize your company data, does it also allow you to add passwords? Most of you might not be aware of it even if you are; you probably don’t know the process (this is why you are here). So, in this article, we will talk about the steps you can take to password protect an Excel spreadsheet.
Let’s get started!
How To Password Protect An Excel File
It is a simple process, yet might feel a little bit lengthy. However, if you do it one or 2 times on a repeat, you will have it at your fingertips. Below are the steps to guide you on how to password protect an Excel file:
- Click File in your Excel worksheet.
- Tap Info.
- Click on the Protect Workbook box.
- Here, choose Encrypt With Password.
- Type a password in the Password section.
- Hit OK.
- Confirm the password by re-entering it into the Reenter Password box and hit OK.
- Your Excel file is now password-protected.
Points To Ponder
- You must be extra careful with your passwords, as Microsoft cannot help retrieve them.
- Be extra careful when sharing your password-protected files, worksheets, and the people you share them with.
How To Password Protect An Excel Worksheet
Your private Excel worksheet must be protected, as you don’t need to share your private data with anyone. Check out these steps to protect your Excel Worksheet on Windows and macOS:
How To Password Protect An Excel Worksheet On Windows
Windows has its own keys and functions, therefore, the steps for Excel file password protection might slightly be different:
- Open the Excel workbook containing the worksheet you want to protect.
- Right-click on the specific worksheet tab you want to secure.
- Select Protect Sheet from the context menu that appears.
- In the Protect Sheet dialog box, check the box next to Protect sheet contents and cells from unauthorized editing.
- Enter your password in the Password to Unprotect sheet section. This password will be required to unlock the sheet for editing later.
- Otherwise, you can customize permissions in the Allow all users of this worksheet to section. This lets you control specific actions users can perform, even with protection enabled.
- Hit OK and apply the password protection.
How to Lock an Excel file with a Password on the Cloud?
Today most people use sheets on the cloud because instead of worrying about timely backup of files, they just work online on the cloud. So, if you want to Password protect Excel spreadsheet, here are the steps you need to follow:
- Click Review and then press Manage Protection.
- Select Protect Sheet in the Manage Protection sheet to protect your desired sheet.
- This locks and protects the entire sheet by default.
- You can unlock specific ranges by clicking on Unlocked Ranges. Enter the range name and cell you want to unlock.
- If you want your sheet to have a password to edit a range, click Range Password.
- Confirm your password. Select Save to ensure you turn on your sheet protection.
- Go to the sheet protection password to protect the entire sheet with a password.
- Enter the password > confirm your password > click Save.
How To Password Protect An Excel Workbook
The workbook works differently than the usual office. Therefore, you have to follow different steps for protecting Excel with a password on it. With the help of the steps listed below, you can password-protect your Excel workbook on different devices and its parts:
How To Password Protect An Excel Workbook On Windows
It is simple and easy to follow. Just 2 steps and you will be done in a few seconds only.
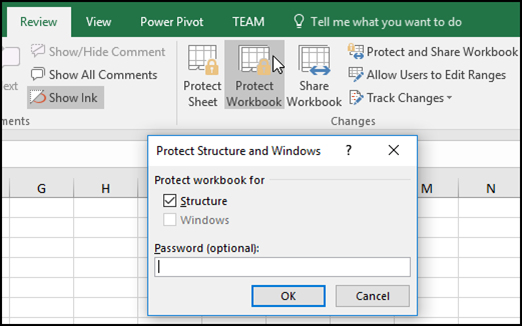
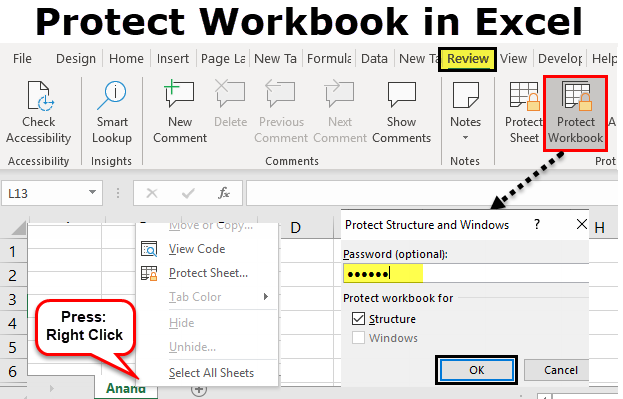
- Click on Review and then Protect Workbook.
- Now, just enter the Password into the password box.
In this way, you can protect the structure of your workbook.
How To Password Protect An Excel Workbook On macOS
Windows might not be your style, and you may prefer Macbook but don’t worry; you can password-protect Excel on MacOS, too. Just follow the steps below:
- For Mac, click on Review > Protect Workbook. This option is available only on Excel 2007, 2010, and Excel for Mac 2011 and 2016.
- Enter your Password in the box given.
- Re-enter your password and press OK.
How To Password Protect An Excel Workbook On Web Browser
- If you are using the Excel version for web, tap on open in Excel in your installed app. Then you can proceed to password protect your Excel workbook on the web.
Why You Need A Password To Open/Modify A Workbook
Once you password-protect your Excel worksheets, everyone must know that password to access them independently. However, if you have
On Latest Versions
- Open the Excel sheet or workbook you need to protect.
- Go to the Review tab. > Click Protect Sheet or Protect Workbook.
- Type in the password in the Password box.
- Re-enter it again in the Verify box.
- If you desire more protection options, click on them as well.
- Press OK.
- Hit Save.
- If you want to remove the password in the future, go to Unprotect Sheet and type the password.
On Office 2011
- Open the desired workbook you want to protect with a password.
- Click on Protection > Review > Passwords.
- Enter a password in the Password to open.
- Tap OK.
- In the prompt of Confirm Password, re-enter your password.
- Hit OK.
- Press Save.
Can you Lock Specific Cells on the Excel Sheet?
Yes. your organizational and data accessibility needs might be different, so you can lock specific cells and keep anyone from editing them.
Locking specific cells in Excel while leaving others editable is a useful feature when you want to control what users can modify in a spreadsheet. Here’s a step-by-step guide on how to achieve this:
-
Open Your Excel Workbook
Open the Excel workbook in which you want to lock specific cells.
-
Select the Cells to Lock
- Click and drag to select the cells or range of cells that you want to lock.
- To select non-adjacent cells, hold down the “Ctrl” key (Windows) or “Command” key (Mac) while clicking on each cell.
-
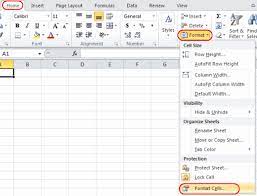
Right-Click and Choose “Format Cells”
- Right-click on the selected cells.
- From the context menu, choose “Format Cells.”
-
Go to the “Protection” Tab
- In the “Format Cells” dialog box, go to the “Protection” tab.
- Uncheck the “Locked” checkbox. This step unlocks the selected cells.
-
Apply Protection to the Worksheet
- Now, go to the “Review” tab on the Excel ribbon.
- Click on “Protect Sheet” in the “Changes” group.
-
Set a Password (Optional)
- If you want to restrict access to the protected sheet, you can set a password in the “Protect Sheet” dialog box.
- Enter and confirm your password.
-
Specify Permissions
- In the “Protect Sheet” dialog box, you can choose various permissions for the protected sheet. Ensure that “Select locked cells” is checked.
- Optionally, you can specify other permissions based on your requirements.
-
Click “OK” to Protect the Sheet
- Click “OK” to apply the protection to the sheet.
- If you set a password, you’ll need to enter it to confirm the protection.
-
Test the Protection
- Try editing cells that were not selected and locked. They should remain editable.
- Attempt to edit the locked cells. Excel should prevent you from making changes.
-
Unprotecting the Sheet
If you need to make changes to the locked cells, go back to the “Review” tab, click on “Unprotect Sheet,” and enter the password if you set one.
By following these steps, you can easily lock specific cells in Excel to prevent editing while leaving other cells editable, providing a controlled environment for data input and manipulation.
Sharing and Collaboration Tips for Securely Managing Protected Excel Files:
Collaborating on Excel files is essential for many teams, and maintaining security while sharing is paramount. Here are some tips for securely sharing and collaborating on protected Excel files:
1. Use SharePoint or OneDrive for Business:
- Why: These platforms provide secure cloud storage with advanced sharing and collaboration features.
- How: Save your Excel file to SharePoint or OneDrive and set permissions accordingly.
2. Assign Specific Permissions:
- Why: Limit access to only those who need it.
- How: When sharing, assign permissions carefully. Use “View” permissions for those who only need to see the data and “Edit” permissions for collaborators.
3. Regularly Review and Update Permissions:
- Why: Ensure that only the necessary individuals have access to the file.
- How: Periodically review and update permissions based on the project’s progress or changes in team composition.
4. Encrypt Sensitive Data:
- Why: Add an extra layer of security to your Excel file.
- How: Before sharing, consider encrypting the Excel file. You can use third-party tools or built-in encryption features.
5. Utilize Password Protection:
- Why: Add an additional safeguard for accessing the file.
- How: Password-protect your Excel file, and securely share the password with authorized collaborators.
6. Enable Workbook Sharing Features:
- Why: Enhance real-time collaboration.
- How: Use Excel’s built-in collaboration features like co-authoring. Ensure everyone is using a compatible version of Excel for seamless collaboration.
7. Version Control:
- Why: Track changes and revert to previous versions if needed.
- How: Regularly save versions of your Excel file and encourage collaborators to use version control features.
8. Educate Collaborators on Protection Measures:
- Why: Ensure everyone is aware of security protocols.
- How: Provide guidelines on how to handle password protection, permissions, and encryption. Conduct training sessions if necessary.
9. Audit Trail for Changes:
- Why: Keep track of modifications made to the Excel file.
- How: Activate the “Track Changes” feature to create an audit trail. This helps in identifying who made changes and when.
10. Regular Backups:
- Why: Protect against accidental data loss.
- How: Regularly back up your Excel file. Cloud platforms often provide automatic versioning, but it’s wise to have local backups as well.
11. Communication Channels:
- Why: Maintain open lines of communication regarding file access and updates.
- How: Establish clear communication channels for team members to notify others when they are working on the file.
12. Document Collaboration Guidelines:
- Why: Ensure everyone follows a standardized approach to collaboration.
- How: Develop and share a document outlining collaboration guidelines, including file protection measures.
By implementing these tips, you can enhance the security of your Excel files while facilitating effective collaboration within your team. Regularly reviewing and updating security measures will help in adapting to changing project dynamics and team compositions.
Final Words
Now, you know how to lock an Excel Spreadsheet with a password or how to password protect an Excel file. Always remember that privacy is a significant part of any organization. You cannot let anyone with no authority have access to your private data. So, be it Excel sheets, your systems, or any other storage platform, always protect them with possible permissions and passwords.
One leak can lead to more severe problems than following the steps above. It is better to add a password to your confidential files than to later regret and retrieve them. If you need a password manager for so many passwords, PassHulk is your one-stop solution.